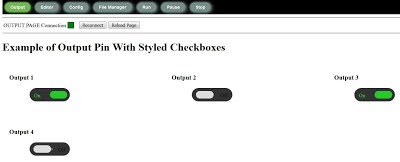
The previous project leads neatly and conveniently on to this one, using the same "How To Style A Checkbox With CSS" by Paulund:
https://paulund.co.uk/style-checkboxes-with-css This time we will focus on the Checkbox 3 section of the article, describing how to create slide switches.
CiccioCB has already created an Annex-Wifi Basic version (shown here) from the article, and even better, has modified it to control 4 gpio pins.
This offers you the useful advantage of having the original article for comparison with CiccioCB's working Basic script below, allowing opportunity to study the differences, and giving potential to apply those changes to other entirely different examples if wished.
Basic:
' example of checkbox styling
' information taken from https://paulund.co.uk/style-checkboxes-with-css ' define the variables that are used for the output pins out1 = 0 out2 = 1 out3 = 1 out4 = 0 sw1 = 12 sw2 = 15 sw3 = 13 sw4 = 16 PIN.MODE sw1, OUTPUT PIN.MODE sw2, OUTPUT PIN.MODE sw3, OUTPUT PIN.MODE sw4, OUTPUT onHtmlChange pinChange onHtmlReload main gosub main wait main: cls a$ = "<html>" a$ = a$ + "<body>" A$ = A$ + |<style>| A$ = A$ + |input[type=checkbox] {| A$ = A$ + | visibility: hidden;| A$ = A$ + |}| A$ = A$ + |section| A$ = A$ + |{| A$ = A$ + | float:left;| A$ = A$ + | width:30%;| A$ = A$ + | margin:20px 20px;| A$ = A$ + |}| A$ = A$ + |.checkboxThree {| A$ = A$ + | width: 120px;| A$ = A$ + | height: 40px;| A$ = A$ + | background: #333;| A$ = A$ + | margin: 20px 60px;| A$ = A$ + | border-radius: 50px;| A$ = A$ + | position: relative;| A$ = A$ + |}| A$ = A$ + |.checkboxThree:before {| A$ = A$ + | content: 'On';| A$ = A$ + | position: absolute;| A$ = A$ + | top: 12px;| A$ = A$ + | left: 13px;| A$ = A$ + | height: 2px;| A$ = A$ + | color: #26ca28;| A$ = A$ + | font-size: 16px;| A$ = A$ + |}| A$ = A$ + |.checkboxThree:after {| A$ = A$ + | content: 'Off';| A$ = A$ + | position: absolute;| A$ = A$ + | top: 12px;| A$ = A$ + | left: 84px;| A$ = A$ + | height: 2px;| A$ = A$ + | color: #111;| A$ = A$ + | font-size: 16px;| A$ = A$ + |}| A$ = A$ + |.checkboxThree label {| A$ = A$ + | display: block;| A$ = A$ + | width: 52px;| A$ = A$ + | height: 22px;| A$ = A$ + | border-radius: 50px;| A$ = A$ + || A$ = A$ + | -webkit-transition: all .5s ease;| A$ = A$ + | -moz-transition: all .5s ease;| A$ = A$ + | -o-transition: all .5s ease;| A$ = A$ + | -ms-transition: all .5s ease;| A$ = A$ + | transition: all .5s ease;| A$ = A$ + | cursor: pointer;| A$ = A$ + | position: absolute;| A$ = A$ + | top: 9px;| A$ = A$ + | z-index: 1;| A$ = A$ + | left: 12px;| A$ = A$ + | background: #ddd;| A$ = A$ + |}| A$ = A$ + |.checkboxThree input[type=checkbox]:checked + label {| A$ = A$ + | left: 60px;| A$ = A$ + | background: #26ca28;| A$ = A$ + |}| A$ = A$ + |</style>| ' eventually all these declarations can be found in this .css file 'a$ = a$ + |<link rel="stylesheet" href=https://paulund.co.uk/playground/demo/css-style-checkboxes/download/css/core.css>| A$ = A$ + |<h1> Example of Output Pin With Styled Checkboxes </h1>| A$ = A$ + |<section>| A$ = A$ + | <h3>Output 1 </h3>| A$ = A$ + | <div class="checkboxThree">| A$ = A$ + checkbox$(out1, "check1") A$ = A$ + | <label for="check1"></label>| A$ = A$ + | </div>| A$ = A$ + |</section>| A$ = A$ + |<section>| A$ = A$ + | <h3>Output 2 </h3>| A$ = A$ + | <div class="checkboxThree">| A$ = A$ + checkbox$(out2, "check2") A$ = A$ + | <label for="check2"></label>| A$ = A$ + | </div>| A$ = A$ + |</section>| A$ = A$ + |<section >| A$ = A$ + | <h3>Output 3 </h3>| A$ = A$ + | <div class="checkboxThree">| A$ = A$ + checkbox$(out3, "check3") A$ = A$ + | <label for="check3"></label>| A$ = A$ + | </div>| A$ = A$ + |</section>| A$ = A$ + |<section >| A$ = A$ + | <h3>Output 4 </h3>| A$ = A$ + | <div class="checkboxThree">| A$ = A$ + checkbox$(out4, "check4") A$ = A$ + | <label for="check4"></label>| A$ = A$ + | </div>| A$ = A$ + |</section>| A$ = A$ + |</body>| A$ = A$ + |</html>| html a$ a$ = "" ' this cleans memory as not required anymore return pinChange: refresh pin(sw1) = out1 pin(sw2) = out2 pin(sw3) = out3 pin(sw4) = out4 return '''''''''''''''''''''''''''''''''''''''''''''''''''''''''''''''''''''''''''''''''''''''''''''''''''''''''''''''''''''''''''''''''''''''''''''''''''''''''' Another possibility (considering that all checkbox switches just differ in style because they all use the same checkbox component under the skin) is the potential to load the original Checkbox 3 html example into a Tryit Editor (as in the previous project) then experiment with applying different style settings to it... perhaps even copying different styles from other interesting articles.
Once
the web version is to your liking, convert it to Annex-Wifi Basic, then
apply the functional changes you discovered from your comparison.
|
|
|

